|
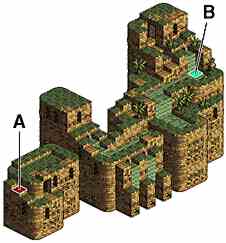
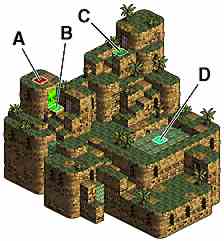
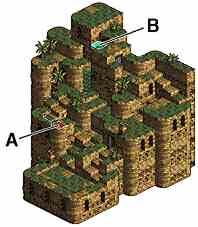
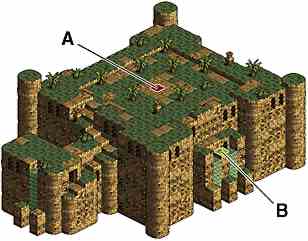
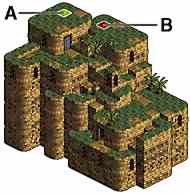
1F: Entrance Denim: So this is the Eden... Martym: I was waiting for you, Denim! Denim: This is it, Martym! There's no way out!! Martym: Don't be so over-confident, kid! We are capable of sending 100,000 troops over to this island! But you will die here in the Eden, way before that happens. Denim: Is that a threat or a promise? Martym: You don't believe me, do you?! (to his troops)I will let you guys handle it! Take care of them for me. Dark Knight: Yes, sir. (Martym leaves) Denim: Wait, Martym!!
|
2F: Water Snake Spine
|
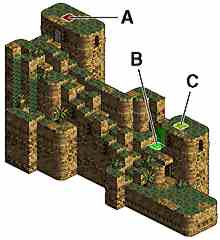
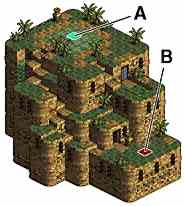
3F: Fisted Man
|
4F: Stomping Woman
| |||||||||||||||||||||||
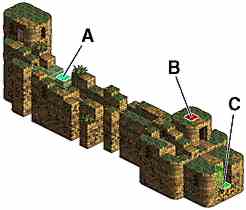
5F: Jewel Tear
| |||||||||||||||||||||||
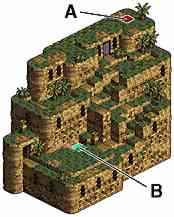
6F: Blue Loop
|
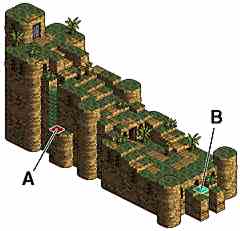
7F: Hair in the Wind
|
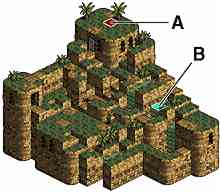
8F: Orgasmic Dream
|
9F: Wine Altar
| |||||||||||||||||||||||
10F: Honeymoon
|
11F: Growling Bastard
|
12F: Red Loop
| |||||||||||||||||||||||
13F: Color of Time
|
14F: Loyal Room
|
15F: Star Gazer
|
16F: Black Loop
|
17F: White Loop
| |||||||||||||||||||||||
|
18F: Heaven and Hell (At the top, Martym and Andoras are waiting) Martym: What do you want?! Denim: Don't you have any pride as a Knight of Lodis? You don't have the guts to fight me! Martym: (drawing his sword) What did you say?! Andoras: Stop Martym! Let me take care of him! You have to go to Barbas!! Martym: Damn you!! You're lucky, kid! (escapes) Denim: Wait, Martym!!
Andoras: ......... Canopus: The Bolmarkans were made slaves by Lodis. Yet, you became a commander in the ranks of the Dark Knights! I'd even bet that you are a member of the Nirdums, the royal family that was destroyed by Lodis. I'm right, aren't I? And you serve the country which massacred and destroyed yours? Why are you working with them? Why didn't you fight against them? You are no different than them! Andoras: You don't understand! How can you possibly understand?! There are a lot of people from Nirdum in Lodis! They have been taken hostage! At least that's how I see it! Canopus: Why are you trying to throw Valeria into the same situation? Andoras: Then kill me! And then stop Barbas! Canopus: Stubborn bastard! Andoras: ...This is the end... Denim: Where is Barbas? Andoras: At the grave of Dolgare...they must be there... Denim: They found the grave? Where is it? Where is the tomb? Tell me! Andoras: The grave...it's underneath the Eden... The entire tower itself is Dolgare's tombstone... Barbas should be...opening up the seal...by now... Denim: How can that be?! Without Kachua, that's impossible! Andoras: The sword...we stole from Zenobia... With the sword, any seal can be broken... Denim: ...We have to hurry! To the underground! Andoras: Denim...listen... The reason why Nirdum was defeated was...the people were not united...like the people of...Valeria... Now that...the situation is such...Lodis may...invade Valeria... Before that happens...you have to unite Valeria...make it...solid...as a rock... | |||||||||||||||||||||||||||
 Cure++ (1/8)
 Magi++ (1/8)
 LifeRock (1/8)
 Antidote (1/8)
 Ambrosia (1/8)
 Arise (1/8)
 Soil (1/8)
 Aqua (1/8)
 Cure+++ (1/8)
 Magi+++ (1/8)
 VanCharm (1/8)
 FolCharm (1/8)
 SolCharm (1/8)
 OhnCharm (1/8)
 HealRain (1/8)
  Heal All (1/8)
  JoyStone (1/4)
 WindOrb (1/8)
 FireOrb (1/8)
 EarthOrb (1/8)
 WaterOrb (1/8)
 HolyOrb (1/8)
 DarkOrb (1/8)

 FoulPear (1/4)
 Nest (1/8)
 Obelon (1/8)
 Steak (1/8)
 Chicken (1/8)
 Burger (1/8)
 Octoball (1/8)
 HolyPlum (3/8)
 Escape (1/8)