The Hell Gate Guide


Blacmore: Now that you've made it to Hell Gate, the real fun begins! Hell Gate is a shrine dedicated to the Dark God Asmodeus, and all of his disciples go there to seek enlightenment. For your purposes, it is a dungeon with 100 floors, each of which you must go through if you want to reach the Last Level. On most levels you will fight a battle, but there are some floors on which you'll run into the ghost of King Roderick. With the exception of his first appearance on floor B6, he appears at random to teach your team members special techniques. These are the skills that you can learn from Roderick:

Name Effect Weapon Required
Fudo Damages target severely, for an amount equal to the user's DEX. Sword
Rage Damages target severely, for an amount equal to the user's STR. No Direct Attack Weapon
FireWave Damages target with a fire-based attack, the power of which depends on the user's MEN. Spear, Axe, Hammer, Claw
MegaBolt Damages target with a wind-based attack, the power of which depends on the user's MEN. Spear, Axe, Hammer, Claw
Dracul Damages target for an amount equal to twice the strength of the user's weapon. Sword
Relic Damages target and turns it to stone. Spear, Axe, Hammer, Claw
RamPower Damages target and knocks it one panel back. Spear, Axe, Hammer, Claw
DevilCry Damages target severely, for an amount equal to the user's current HP.
The user's HP drops to critical condition.
Spear, Axe, Hammer, Claw
SoulWave Damages target and lowers its maximum HP. Spear, Axe, Hammer, Claw
Agony Damages target for an amount equal to the difference between the user's current HP and their maximum HP. Sword


Blacmore: There is also a lot of valuable treasure to be found in Hell Gate. Here's a list of all the rare items you can find:

Swords

Warrior
Ogre
Notos
Balmuck
Oricon
Axes

Boleas
Rune
Heavy
Blood
Spears

Hero
Earth
Zepyulos
Unicorn
Evil
Igunis
Holy
Hammers

Eros
Power
Dark
Staffs

Wind
Charge
Ripple
Whips

Blood
Bows

Star
Chaos
Dark
Crossbows

Paragun
Armor

Warrior
Grim
Angel
Ogre
Robes

Wind
Evil
Holy
Helmets

Warrior
Skull
Light
Ogre
Necklaces

Evil
Boots

Holy
Zombie
Shields

Angel
Ogre
Gauntlets

Warrior
Rings

Evil


Blacmore: You'll also encounter some enemy classes in Hell Gate that you haven't seen anywhere else. You can't recruit most of them, but there are some that you can.

Name Description Skills & Abilities
Dark Stalker A Dark Ninja. Extremely fast with a large movement range, this class is a lycanthrope from the Dark World like a Werewolf or a Vampire. Cannot be persuaded. Any Spells
Dark Eye A Dark Cyclops that is stronger than a normal Cyclops. Cannot be persuaded. EvilEyes
Dark Wing A Dark Gryphon that has a large range of motion, like a Gryphon. Cannot be persuaded. Petrify
Dark Dragon A Dark Tiamat that induces fear in all surrounding enemies, just like a Tiamat. Cannot be persuaded. Toxic
Basilisk A snake-like monster from the desert that looks like an olive-colored Dragon. Cannot be persuaded. Poison
EvilEyes
Dragon Zombie An undead Tiamat brought back by Necromancy. Weaker than a Tiamat, but more aggressive. Cannot be persuaded. Toxic
Death Giant An undead Cyclops brought back by the power of Necromancy. Cannot be persuaded. Toxic
Death Hydra An undead Hydra brought back by the power of Necromancy. Is extremely strong and aggressive. Cannot be persuaded. Poison
Petrify

Toxic
Fire Brass A Copper Dragon that looks like an orange Tiamat. Is highly resistant to Fire attacks. Cannot be persuaded. Crimson
Phoenix A firebird changed into a monster by the poisonous air of Hell Gate. Looks like an orange Gryphon. Cannot be persuaded. Crimson
Salamander A fiery Dragon that looks like an orange Dragon. Is abnormally fast for a Dragon. Cannot be persuaded. Fire
Fire Drake The strongest Dragon of the Fire element, which looks like an orange Holy Dragon. Cannot be persuaded. Fire
Death Dragon A descendant of the Divine Dragon that has fallen to the darkness. Looks like a blue Holy Dragon. Cannot be persuaded. Ice
Gabiar An Alligator Man who is related to the Lizard Man, but is stronger. Looks like an olive and gray-colored Lizard Man. Cannot be persuaded. All Spells
Gargoyle A statue that was brought to life by an evil magician. Looks like a dark gray Tiamat. Cannot be persuaded. Toxic
Hippogriff A bird-like creature that used to live in heaven. Looks like a green and brown-colored Gryphon. Cannot be persuaded. WindShot
Tornado
Ice Giant A giant that lives in a very cold region. Looks like a blue Cyclops. Cannot be persuaded. Spiral
Ice
Iron Golem A Golem made out of iron instead of clay. Is stronger and has better defense than a Golem. Cannot be persuaded. Dragos
Kraken A relative of the Octopus that seems to have come from a distant sea. Looks like a gray Octopus. Cannot be persuaded. Eddy
Hazard
Lucifer Crow A bird with cold breath and frozen blood. Looks like a blue and purple Gryphon. Cannot be persuaded. Ice
Lufu A creature that used to pull the chariot of a Dark God. Looks like an orange and brown Cockatrice. Cannot be persuaded. Poison
Obinick A beast that was transformed by the poisonous air of Hell Gate. Cannot be persuaded. Fire
Raven Man A winged man that has fallen to the darkness. Looks like a black Hawk Man, and is very aggressive and violent. Cannot be persuaded. All Spells
Relics Knight An insane warrior that had come from another dimension. He looks like a gold and red Terror Knight, and his hobby is to hunt humans. Cannot be persuaded. All Spells
Succula A Sea Dragon with many heads, that looks like a white Hydra. Cannot be persuaded. Poison
Petrify

Toxic
Guardian The strongest monster in Hell Gate. There are four different Guardians: Waltz (gold Holy Dragon), Golden (gold Gryphon), BlueMoon (gold Golem), and HardWind (gold Tiamat). Cannot be persuaded. Tornado
Thunder
WindShot
Goblin A demi-human that is roughly as powerful as a Knight. Can move 6 panels. None
Gorgon A mythical beast that has snakes for hair. Can turn enemies to stone with her glare. EvilEyes
Hydra The strongest and most versatile type of Dragon, the Hydra can use breath attacks of all four elements. A little slow, though. Fire
Poison
Ice
Thunder


Blacmore: Now, let's get on to the actual guide of the trip through Hell Gate...


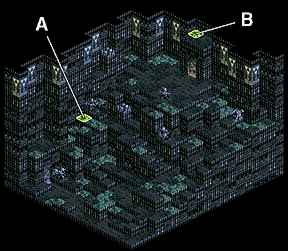
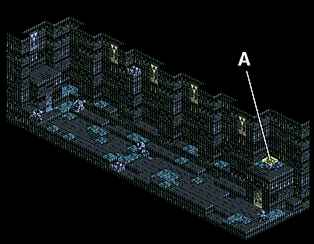
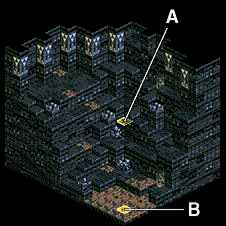
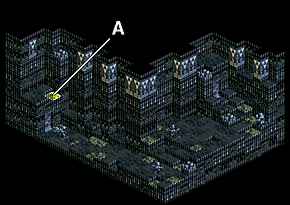
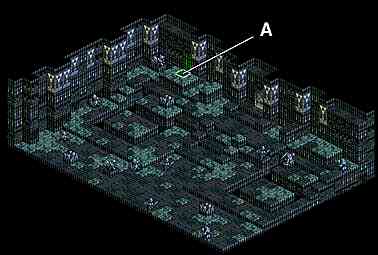
Hell Gate B1

Falfadet: I never thought I'd meet you here. Did you come here to find the Dragon Magic? Not good, not good. Now that I don't have the help of the Dark Knights, I'm not going to risk my life by giving you the Dragon Magic. If I kill you, then there will be no reason to hide in this filthy dungeon. This Hell Gate will be your grave, little boy.
 

Falfadet
Venefik
Battle A: Hell Gate B1

Objective: Kill the leader!
Leader: Falfadet (drops Evil Robe)
Enemies: 2 Wizards, 1 Warlock, 1 Exorcist, 2 Sirens, 1 Witch, 1 Cleric, 1 Priest
Union: Bacrum Valeria Country
Notes:
  • The enemy Warlock has Petrify, so you would be wise to persuade him over to your side. You'll want to persuade him with as much HP remaining as possible so that he can survive an attack from Falfadet.
     
  • The Exorcist has Exorcism and will not hesitate to use it, so you'd be best off by letting your Ghosts and Skeletons sit this one out!
     
  • All of the enemies have Warp Rings. You may want to persuade a few of the enemies for them!


Falfadet: You will never...make it to...the deepest...part...of...Hell Gate...
 
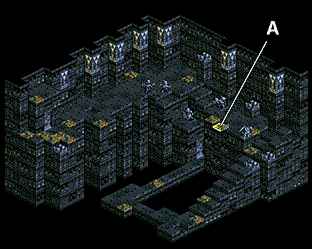
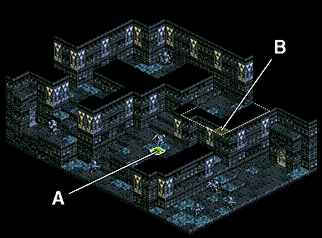
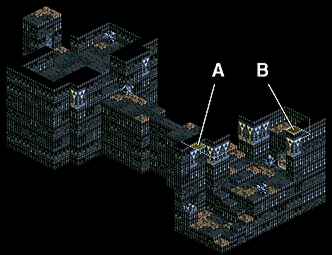
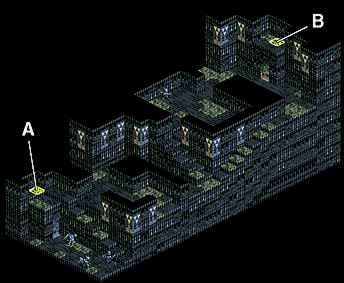
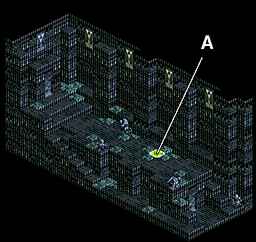
Hell Gate B2

Denim: This is creepy...
(elsewhere in the room, a Warlock is fleeing from some monsters)
Young Man's Voice: Damn! I can't kill them unless I use Holy Magic!!
Radlum: I am doomed!!
Denim: Let's go! We are going to rescue him!!

 
Battle B: Hell Gate B2

Objective: Kill all enemies!
Enemies: 4 Skeletons, 3 Ghosts, 2 Tiamats
Union: Unknown
Guests: Radlum
Notes: Radlum isn't exactly the most rational warrior, and rescuing him can be a very tricky task since he is surrounded by enemies. He has very low physical defense, so he won't be able to survive more than 2-3 attacks. Here are a few strategies to save him:
  • Try and kill the Skeleton and Tiamat that are between your troops and Radlum. When Radlum gets to attack, it's more likely that he'll run towards your troops if the enemies on that side are gone.
     
  • Make good use of Teleport, which you should have if you recruited Shelley. You can teleport a strong character over to the area where the large group of undead is, and they may attack your character instead of Radlum.
     
  • Alternatively, you can teleport someone with Petrify over to Radlum's location and immobilize Radlum to prevent him from doing anything stupid. Then have your character block the far enemies from reaching Radlum. If he's petrified and there's one of your characters around who isn't, the enemy will almost always attack your character.
     
  • If all else fails, you can leave Hell Gate after floor B1 and go and find Deneb's Store, stocking up on Holy Orbs. Use 1-3 of those against the enemy, and you'll wipe out most of them at least temporarily. Of course, this relies on the assumption that you saved the game before going to floor B2...
Radlum: Thank you for saving my life. I came to this Hell Gate to find the Dragon Magic. But it is too difficult to go any further alone. If you don't mind, can I join you? I know you. Aren't you the members of the Liberation Army fighting against the Dark Knights? If you allow me to join you, I can be of good use. How's that sound?
 
Denim: 1. It's alright.
2. I can't.
Denim: I can't. I have to turn down your offer. I'm not a deal-making kind of guy.
Radlum: That's too bad... Be careful though, the further you go, the more dangerous it becomes.


Denim: It's alright. Welcome to our troops, Radlum.
Radlum: Thank you for accepting me.
Join up!

Radlum
Warlock
 
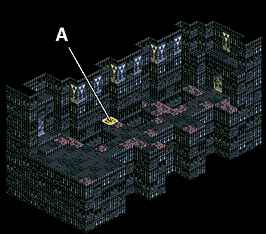
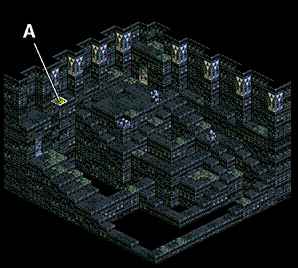
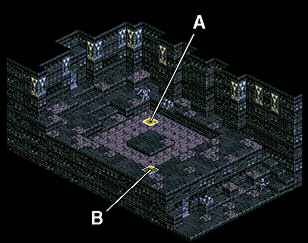
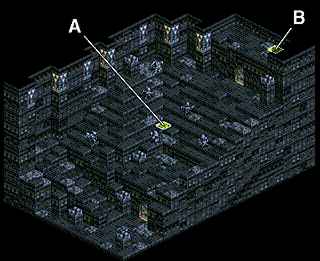
Hell Gate B3

Denim: Who the hell made this spooky dungeon?
(A young girl appears)
Young Girl: Why are you here?
Denim: Why are you here?! ...Did you come here by yourself?
Young Girl: No. Everyone died. They turned into stone.
Denim: Stone?
Young Girl: Do you see those statues nearby?
Denim: Y, you mean these are...
Young Girl: Yes. They were turned into statues. The guardian of the shrine put a curse on them which turned them into statues. Everyone here was once human.
Denim: Why have they been turned into stone?!
Young Girl: This shrine is a sacred place...only disciples of Asmodeus are allowed here.
Denim: Who are you......?
Young Girl: My name is Zadova. And now you are going to be turned into stone!!! (reveals her true image and summons allies)
Denim: What?! Are you the guardian of ths shrine?!
Zadova: Stupid human!! You have come to destroy the shrine! You shall be turned to stone!


Zadova
Gorgon
Battle C: Hell Gate B3

Objective: Kill the leader!
Leader: Zadova (drops Warp Ring)
Enemies: 2 Skeletons, 3 Ghosts, 4 Goblins
Union: Unknown
Notes:
  • As a Gorgon, Zadova has the power to turn your entire team to stone. Characters will not be turned to stone if they meet one of the following criteria:
    1. They have a shield equipped.
    2. They are not directly facing the Gorgon.
    3. They are not in front of the Gorgon.
    4. There is another character or an obstacle between the Gorgon and the character.
    5. They have some sort of protection against petrification (Desert Sword, Blue Necklace, etc.).
  • On the map above, you'll notice that there is a highlighted area. You need to move a character to this area and open the secret passageway in order to move on--otherwise, you'll leave Hell Gate after this battle!


Zadova: It's alright...the more you crave the power, the closer you are to following the dark side... Go ahead...step over my body and pursue the dark path...
 
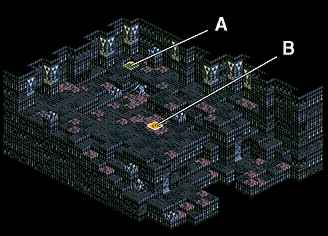
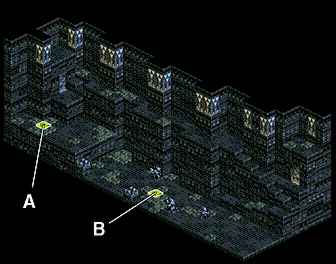
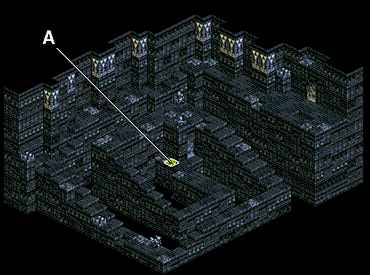
Hell Gate B4 (Law and Chaos Routes)

(In the room, Nybbas is standing with Leonard and Zaebos, who have been brought back from the dead)
Nybbas: Hmmm. The cells are decaying. It's not complete. "Necro" will only turn the living into the undead... "Revivify" will only bring back life, but the aging process can't be stopped. My son was so close. I was able to regenerate his body cells. But I was unable to retrieve his memory... I am trying to achieve what you would call a soul recovery. It is very difficult. When one condition is met, another thing goes wrong... Sorry, I have failed again. Forgive me. Everlasting life and youth is the one thing that all human beings strive for. ...I guess I'll have to use this.
(Denim and his troops arrive)
Nybbas: Oh, look here...
Denim: Leonard!! How did you get here?!
Nybbas: You are the last person I expected to see here. Ah yes, I remember now. It's Denim, right? I'm so glad to see you again. What are you doing here? Why the Hell Gate? Are you seeking the Dragon Magic? ...Or are you seeking eternal life like me? Shall I show you the results of my research? Don't be shy, I'm so anxious to show you. (summons undead) You took real good care of me in Kadoriga. So this time, why don't I pay you back?


Nybbas
Necromancer

Leonard
Death Knight

Zaebos
Death Knight
Battle D: Hell Gate B4

Objective: Kill the leader!
Leader: Nybbas
Enemies: Leonard (drops Earth Spear), Zaebos (drops Hero Spear), 1 Skeleton, 3 Ghosts, 1 Wizard Zombie, 1 Amazon Zombie, 1 Archer Zombie
Union: Corpse
Notes:
  • There is nothing that you can do to save either Leonard or Zaebos. Your best bet would be to aim your attacks for Nybbas, because once you kill him both Leonard and Zaebos will die automatically, leaving behind their treasure.
     
  • The treasure found is as follows:
    Group LUK
    0 - 42
    LUK
    43 - 56
    LUK
    57 - 100
    A
    Cure+ (1/8)
    Magi+ (1/8)
    LifeRock (1/8)
    Antidote (1/8)
    Ambrosia (1/8)
    Arise (1/8)
    Wind (1/8)
    Fire (1/8)
    Cure+++ (1/8)
    Magi+++ (1/8)
    VanCharm (1/8)
    FolCharm (1/8)
    SolCharm (1/8)
    OhnCharm (1/8)
    Jump (1/8)
    Heal All (1/8)
    Blessing (1/8)
    JoyStone (1/8)
    WindOrb (1/8)
    FireOrb (1/8)
    EarthOrb (1/8)
    WaterOrb (1/8)
    HolyOrb (1/8)
    DarkOrb (1/8)


Denim: Leonard! It's me, Denim!
Leonard: .........
Nybbas: It's no use. He doesn't remember anything, because his soul is missing. Do you know why the undead love to fight? Because they are in constant agony to be dead. They envy life and hate those that possess it. To ease their pain, they will try to make you just like them!
Denim: If I cannot save Leonard...then I will turn you into one of the living dead!!

 
Zaebos: Why am I here? What is this body...?
Denim: Zaebos!
Zaebos: Nybbas? What am I doing here...? (dies)
Nybbas: Good job...hee, hee, hee.
Leonard: ...Where am I? What was I...
Denim: Leonard!
Leonard: Denim...? I was dead... (dies)
Denim: Leonard!!

Nybbas: Th...this is the end...King of Darkness Demunza, give me the power of darkness which has been sealed within this ring... May the seal be broken!! (dies, but is resurrected as a Lich)
Nybbas: How do you like this? Hee, hee, hee... If you are craving for the ability to become an undead, it can only be achieved by using the knowledge. But you have to give up being a human being. Hee, hee, hee. I may see you again...so long... (escapes)
Denim: Wait, Nybbas!!
 
Hell Gate B4 (Neutral Route)

Nybbas: You are the last person I expected to see here. Ah yes, I remember now. It's Denim, right? I'm so glad to see you again. What are you doing here? Why the Hell Gate? Are you seeking the Dragon Magic? ...Or are you seeking eternal life like me? Shall I show you the results of my research? Don't be shy, I'm so anxious to show you. (summons undead) I may have lost the battle at Fort Damsa, but this time you are the one who's going to lose.
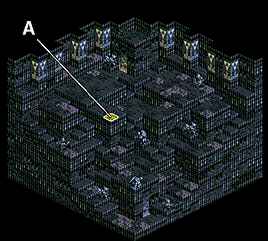
 

Nybbas
Lich
Battle D: Hell Gate B4

Objective: Kill the leader!
Leader: Nybbas
Enemies: 1 Skeleton, 3 Ghosts, 1 Knight Zombie, 1 Berzerker Zombie, 1 Wizard Zombie, 1 Amazon Zombie, 1 Archer Zombie
Union: Corpse
Notes:
  • The Berzerker Zombie has the Light Hammer, but as far as it's known there is no way for you to get it from him.
     
  • The treasure found is as follows:
    Group LUK
    0 - 42
    LUK
    43 - 56
    LUK
    57 - 100
    A
    Cure+ (1/8)
    Magi+ (1/8)
    LifeRock (1/8)
    Antidote (1/8)
    Ambrosia (1/8)
    Arise (1/8)
    Wind (1/8)
    Fire (1/8)
    Cure+++ (1/8)
    Magi+++ (1/8)
    VanCharm (1/8)
    FolCharm (1/8)
    SolCharm (1/8)
    OhnCharm (1/8)
    Jump (1/8)
    Heal All (1/8)
    Blessing (1/8)
    JoyStone (1/8)
    WindOrb (1/8)
    FireOrb (1/8)
    EarthOrb (1/8)
    WaterOrb (1/8)
    HolyOrb (1/8)
    DarkOrb (1/8)


Orias: Nybbas! This is the last day of your life! I'm sending you to Hell!
Nybbas: Is that all you have to say to your own father? What a naughty girl!
Orias: I never wanted a monster for my father!! ...And you will regret having me for a daughter!!
Nybbas: Stupid fools...you are killing people under a guise of a revolution. How can murderers like you criticize me?! Your hands are stained with blood, just like mine. You and I are the same...

Nybbas: Hmmm...I think I will retreat for now... (escapes)
Denim: Wait, Nybbas!!
 
Hell Gate B5
 
Group A Group B
LUK
0 - 42
LUK
43 - 56
LUK
57 - 100
LUK
0 - 42
LUK
43 - 56
LUK
57 - 100
Cure+ (1/8)
Magi+ (1/8)
LifeRock (1/8)
Antidote (1/8)
Ambrosia (1/8)
Arise (1/8)
Wind (1/8)
Fire (1/8)
Cure+++ (1/8)
Magi+++ (1/8)
VanCharm (1/8)
FolCharm (1/8)
SolCharm (1/8)
OhnCharm (1/8)
Jump (1/8)
Heal All (1/8)
Blessing (1/8)
JoyStone (1/8)
WindOrb (1/8)
FireOrb (1/8)
EarthOrb (1/8)
WaterOrb (1/8)
HolyOrb (1/8)
DarkOrb (1/8)

 
FoulPear (1/4)
Nest (1/8)
Obelon (1/8)
Steak (1/8)
Chicken (1/8)
Burger (1/8)
Octoball (1/8)
Blessing (1/8)
JoyStone (1/8)
WindOrb (1/8)
FireOrb (1/8)
EarthOrb (1/8)
WaterOrb (1/8)
HolyOrb (1/8)
DarkOrb (1/8)
JoyStone (3/8)
Blessing (1/8)
HolyPlum (1/4)
MindKiwi (1/8)
Escape (1/8)
 
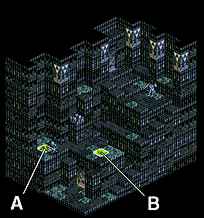
Hell Gate B6

(Denim enters a seemingly empty room)
Denim: I guess there are no enemies on this floor...
(A ghastly figure appears behind Denim)
Denim: What the...!!
Ghost: Do not act in haste, mortal man.
Denim: Who are you?!
Ghost: My name is Roderick. I used to be the King of Brigantes...
Denim: Roderick, you were the loser in the Unity War against King Dolgare?
Roderick: Yes......are you the man who battles against Vesinian?
Denim: Vesinian? You mean the Bacrum Army?
Roderick: The man who fights against Vesinian is my friend. I shall share my power with you...
Denim: Power?
Roderick: Yes. I will teach you the secret technique of Brigantes which has been preserved for generations... There are 10 kinds of secret techniques...but I can only teach you one...that has been the rule and... besides, humans are not capable of learning more than one... First, I'll give you the ability in which you will be able to change your inner power into an energy sword. Whoever has a sword may achieve the secret technique. Who wants to have this?
(At this time, he teaches Fudo to the ally of your choice)
Roderick: We shall meet again... (disappears)

Note: This is the one time that Roderick appears at a fixed point to teach one of your characters a special technique. Since the damage that Fudo does is equal to the user's DEX, I would recommend giving it to either Guildus, Haborym, or another of your characters that has really high DEX. When you are brought to the unit selection screen for the first time, you'll be asked (in wrong wording) if you wish for a character of yours to learn the technique. Choose "Yes," which is the first option--otherwise, you'll permanently forgo the opportunity to learn the technique!
 
Hell Gate B10
 
Group LUK
0 - 42
LUK
43 - 56
LUK
57 - 100
A
Cure+ (1/8)
Magi+ (1/8)
LifeRock (1/8)
Antidote (1/8)
Ambrosia (1/8)
Arise (1/8)
Wind (1/8)
Fire (1/8)
Cure+++ (1/8)
Magi+++ (1/8)
VanCharm (1/8)
FolCharm (1/8)
SolCharm (1/8)
OhnCharm (1/8)
Jump (1/8)
Heal All (1/8)
Blessing (1/8)
JoyStone (1/8)
WindOrb (1/8)
FireOrb (1/8)
EarthOrb (1/8)
WaterOrb (1/8)
HolyOrb (1/8)
DarkOrb (1/8)

 
B
Cure+ (1/8)
Magi+ (1/8)
LifeRock (1/8)
Antidote (1/8)
Ambrosia (1/8)
Arise (1/8)
Wind (1/8)
Fire (1/8)
Cure+++ (1/8)
Magi+++ (1/8)
VanCharm (1/8)
FolCharm (1/8)
SolCharm (1/8)
OhnCharm (1/8)
Jump (1/8)
Heal All (1/8)
Blessing (1/8)
JoyStone (1/8)
WindOrb (1/8)
FireOrb (1/8)
EarthOrb (1/8)
WaterOrb (1/8)
HolyOrb (1/8)
DarkOrb (1/8)


Hell Gate B15
 
Group LUK
0 - 42
LUK
43 - 56
LUK
57 - 100
A
Cure+ (1/8)
Magi+ (1/8)
LifeRock (1/8)
Antidote (1/8)
Ambrosia (1/8)
Arise (1/8)
Wind (1/8)
Fire (1/8)
Cure+++ (1/8)
Magi+++ (1/8)
VanCharm (1/8)
FolCharm (1/8)
SolCharm (1/8)
OhnCharm (1/8)
Jump (1/8)
Heal All (1/8)
Blessing (1/8)
JoyStone (1/8)
WindOrb (1/8)
FireOrb (1/8)
EarthOrb (1/8)
WaterOrb (1/8)
HolyOrb (1/8)
DarkOrb (1/8)


Hell Gate B20
 
Group A Group B
LUK
0 - 42
LUK
43 - 56
LUK
57 - 100
LUK
0 - 42
LUK
43 - 56
LUK
57 - 100
FoulPear (1/4)
Nest (1/8)
Obelon (1/8)
Steak (1/8)
Chicken (1/8)
Burger (1/8)
Octoball (1/8)
Blessing (1/8)
JoyStone (1/8)
WindOrb (1/8)
FireOrb (1/8)
EarthOrb (1/8)
WaterOrb (1/8)
HolyOrb (1/8)
DarkOrb (1/8)
JoyStone (3/8)
Blessing (1/8)
HolyPlum (1/4)
MindKiwi (1/8)
Escape (1/8)

 
Cure+ (1/8)
Magi+ (1/8)
LifeRock (1/8)
Antidote (1/8)
Ambrosia (1/8)
Arise (1/8)
Wind (1/8)
Fire (1/8)
Cure+++ (1/8)
Magi+++ (1/8)
VanCharm (1/8)
FolCharm (1/8)
SolCharm (1/8)
OhnCharm (1/8)
Jump (1/8)
Heal All (1/8)
Blessing (1/8)
JoyStone (1/8)
WindOrb (1/8)
FireOrb (1/8)
EarthOrb (1/8)
WaterOrb (1/8)
HolyOrb (1/8)
DarkOrb (1/8)


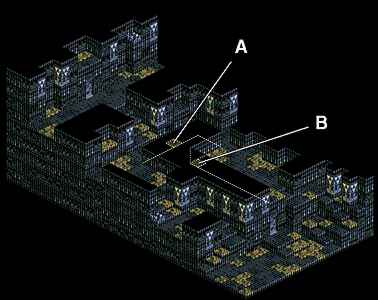
Hell Gate B25

Vepar: Denim of Griate, how did you get here?! I was so close to solving the mystery of the FireSeal! Everyone! You can't allow him to proceed any further! Kill him!
 

Vepar
Searzist
Battle E: Hell Gate B25

Objective: Kill the leader!
Leader: Vepar (drops Starion)
Enemies: 2 Sword Masters, 2 Dragoons, 1 Wizard, 2 Valkyries, 1 Witch, 1 Cleric
Union: Bacrum Valeria Country
Notes:
  • This battle is absolutely laden with treasure--several of the enemy troops have rare items! One of the Dragoons has the Light Helmet, the Witch has the Wind Staff, and the Cleric has the Holy Robe.
     
  • Keep someone within a 7-panel range of Vepar so that she continually wastes her MP on LightBow (that shouldn't be hard to do). Otherwise, she may save up the 60 MP that it takes for her to use Starion, which is a powerful holy-elemental spell that will damage your entire party. Given this and the fact that she has a special skill called Jihad which will vaporize undead characters, it would probably be best to let your Ghosts and Skeletons sit this one out!
     
  • The treasure found is as follows:
    Group LUK
    0 - 42
    LUK
    43 - 56
    LUK
    57 - 100
    A
    Cure+ (1/8)
    Magi+ (1/8)
    LifeRock (1/8)
    Antidote (1/8)
    Ambrosia (1/8)
    Arise (1/8)
    Wind (1/8)
    Fire (1/8)
    Cure+++ (1/8)
    Magi+++ (1/8)
    VanCharm (1/8)
    FolCharm (1/8)
    SolCharm (1/8)
    OhnCharm (1/8)
    Jump (1/8)
    Heal All (1/8)
    Blessing (1/8)
    JoyStone (1/8)
    WindOrb (1/8)
    FireOrb (1/8)
    EarthOrb (1/8)
    WaterOrb (1/8)
    HolyOrb (1/8)
    DarkOrb (1/8)


Vepar: I was so close...I was so close to...solving the mystery of the treasure...
 
Hell Gate B30
 
Group LUK
0 - 42
LUK
43 - 56
LUK
57 - 100
A
FoulPear (1/4)
Nest (1/8)
Obelon (1/8)
Steak (1/8)
Chicken (1/8)
Burger (1/8)
Octoball (1/8)
Blessing (1/8)
JoyStone (1/8)
WindOrb (1/8)
FireOrb (1/8)
EarthOrb (1/8)
WaterOrb (1/8)
HolyOrb (1/8)
DarkOrb (1/8)
JoyStone (3/8)
Blessing (1/8)
HolyPlum (1/4)
MindKiwi (1/8)
Escape (1/8)

 
B
Cure+ (1/8)
Magi+ (1/8)
LifeRock (1/8)
Antidote (1/8)
Ambrosia (1/8)
Arise (1/8)
Wind (1/8)
Fire (1/8)
Cure+++ (1/8)
Magi+++ (1/8)
VanCharm (1/8)
FolCharm (1/8)
SolCharm (1/8)
OhnCharm (1/8)
Jump (1/8)
Heal All (1/8)
Blessing (1/8)
JoyStone (1/8)
WindOrb (1/8)
FireOrb (1/8)
EarthOrb (1/8)
WaterOrb (1/8)
HolyOrb (1/8)
DarkOrb (1/8)


Hell Gate B35
 
Group LUK
0 - 42
LUK
43 - 56
LUK
57 - 100
A
Cure+ (1/8)
Magi+ (1/8)
LifeRock (1/8)
Antidote (1/8)
Ambrosia (1/8)
Arise (1/8)
Wind (1/8)
Fire (1/8)
Cure+++ (1/8)
Magi+++ (1/8)
VanCharm (1/8)
FolCharm (1/8)
SolCharm (1/8)
OhnCharm (1/8)
Jump (1/8)
Heal All (1/8)
Blessing (1/8)
JoyStone (1/8)
WindOrb (1/8)
FireOrb (1/8)
EarthOrb (1/8)
WaterOrb (1/8)
HolyOrb (1/8)
DarkOrb (1/8)


Hell Gate B40
 
Group LUK
0 - 42
LUK
43 - 56
LUK
57 - 100
A
Cure+ (1/8)
Magi+ (1/8)
LifeRock (1/8)
Antidote (1/8)
Ambrosia (1/8)
Arise (1/8)
Wind (1/8)
Fire (1/8)
Cure+++ (1/8)
Magi+++ (1/8)
VanCharm (1/8)
FolCharm (1/8)
SolCharm (1/8)
OhnCharm (1/8)
Jump (1/8)
Heal All (1/8)
Blessing (1/8)
JoyStone (1/8)
WindOrb (1/8)
FireOrb (1/8)
EarthOrb (1/8)
WaterOrb (1/8)
HolyOrb (1/8)
DarkOrb (1/8)

 
B
Cure+ (1/8)
Magi+ (1/8)
LifeRock (1/8)
Antidote (1/8)
Ambrosia (1/8)
Arise (1/8)
Wind (1/8)
Fire (1/8)
Cure+++ (1/8)
Magi+++ (1/8)
VanCharm (1/8)
FolCharm (1/8)
SolCharm (1/8)
OhnCharm (1/8)
Jump (1/8)
Heal All (1/8)
Blessing (1/8)
JoyStone (1/8)
WindOrb (1/8)
FireOrb (1/8)
EarthOrb (1/8)
WaterOrb (1/8)
HolyOrb (1/8)
DarkOrb (1/8)


Hell Gate B45
 
Group LUK
0 - 42
LUK
43 - 56
LUK
57 - 100
A
Cure+ (1/8)
Magi+ (1/8)
LifeRock (1/8)
Antidote (1/8)
Ambrosia (1/8)
Arise (1/8)
Wind (1/8)
Fire (1/8)
Cure+++ (1/8)
Magi+++ (1/8)
VanCharm (1/8)
FolCharm (1/8)
SolCharm (1/8)
OhnCharm (1/8)
Jump (1/8)
Heal All (1/8)
Blessing (1/8)
JoyStone (1/8)
WindOrb (1/8)
FireOrb (1/8)
EarthOrb (1/8)
WaterOrb (1/8)
HolyOrb (1/8)
DarkOrb (1/8)


Hell Gate B50

Belzbute: How rare it is to see a human being down here...ah, you must be the leader of the Liberation Army, Denim of Griate! No wonder you made it here... You will be the ideal sacrifice to our lord Asmodeus!
 

Belzbute
Demon
Battle F: Hell Gate B50

Objective: Kill the leader!
Leader: Belzbute (drops Death)
Enemies: 5 Skeletons, 4 Ghosts
Union: Unknown
Notes:
  • Belzbute may look like an ordinary Siren, but she is equipped with Death, the Shadow-elemental Forbidden Spell. If she gets to use it, she can deal your party a lot of damage--get some characters near her so that she wastes her MP using Pain on them instead. The Angel Knight's Calm Song ability is invaluable in this battle!
     
  • You may be tempted to just end this battle; however, notice that some of the undead characters have special items. One of the Skeletons has the Wing Shoes, another of them has the Warp Ring, and one of the Ghosts has the Wind Robe. To get these items, you'll need to persuade the characters that possess them.
     
  • The treasure found is as follows:
    Group LUK
    0 - 42
    LUK
    43 - 56
    LUK
    57 - 100
    A
    Cure+ (1/8)
    Magi+ (1/8)
    LifeRock (1/8)
    Antidote (1/8)
    Ambrosia (1/8)
    Arise (1/8)
    Wind (1/8)
    Fire (1/8)
    Cure+++ (1/8)
    Magi+++ (1/8)
    VanCharm (1/8)
    FolCharm (1/8)
    SolCharm (1/8)
    OhnCharm (1/8)
    Jump (1/8)
    Heal All (1/8)
    Blessing (1/8)
    JoyStone (1/8)
    WindOrb (1/8)
    FireOrb (1/8)
    EarthOrb (1/8)
    WaterOrb (1/8)
    HolyOrb (1/8)
    DarkOrb (1/8)

     
    B
    FoulPear (1/4)
    Nest (1/8)
    Obelon (1/8)
    Steak (1/8)
    Chicken (1/8)
    Burger (1/8)
    Octoball (1/8)
    Blessing (1/8)
    JoyStone (1/8)
    WindOrb (1/8)
    FireOrb (1/8)
    EarthOrb (1/8)
    WaterOrb (1/8)
    HolyOrb (1/8)
    DarkOrb (1/8)
    JoyStone (3/8)
    Blessing (1/8)
    HolyPlum (1/4)
    MindKiwi (1/8)
    Escape (1/8)


Belzbute: How can I be killed...by a human being...?
 
Hell Gate B55
 
Group LUK
0 - 42
LUK
43 - 56
LUK
57 - 100
A
Cure+ (1/8)
Magi+ (1/8)
LifeRock (1/8)
Antidote (1/8)
Ambrosia (1/8)
Arise (1/8)
Wind (1/8)
Fire (1/8)
Cure+++ (1/8)
Magi+++ (1/8)
VanCharm (1/8)
FolCharm (1/8)
SolCharm (1/8)
OhnCharm (1/8)
Jump (1/8)
Heal All (1/8)
Blessing (1/8)
JoyStone (1/8)
WindOrb (1/8)
FireOrb (1/8)
EarthOrb (1/8)
WaterOrb (1/8)
HolyOrb (1/8)
DarkOrb (1/8)

 
B
Cure+ (1/8)
Magi+ (1/8)
LifeRock (1/8)
Antidote (1/8)
Ambrosia (1/8)
Arise (1/8)
Wind (1/8)
Fire (1/8)
Cure+++ (1/8)
Magi+++ (1/8)
VanCharm (1/8)
FolCharm (1/8)
SolCharm (1/8)
OhnCharm (1/8)
Jump (1/8)
Heal All (1/8)
Blessing (1/8)
JoyStone (1/8)
WindOrb (1/8)
FireOrb (1/8)
EarthOrb (1/8)
WaterOrb (1/8)
HolyOrb (1/8)
DarkOrb (1/8)


Hell Gate B60
 
Group LUK
0 - 42
LUK
43 - 56
LUK
57 - 100
A
Cure+ (1/8)
Magi+ (1/8)
LifeRock (1/8)
Antidote (1/8)
Ambrosia (1/8)
Arise (1/8)
Wind (1/8)
Fire (1/8)
Cure+++ (1/8)
Magi+++ (1/8)
VanCharm (1/8)
FolCharm (1/8)
SolCharm (1/8)
OhnCharm (1/8)
Jump (1/8)
Heal All (1/8)
Blessing (1/8)
JoyStone (1/8)
WindOrb (1/8)
FireOrb (1/8)
EarthOrb (1/8)
WaterOrb (1/8)
HolyOrb (1/8)
DarkOrb (1/8)

 
B
FoulPear (1/4)
Nest (1/8)
Obelon (1/8)
Steak (1/8)
Chicken (1/8)
Burger (1/8)
Octoball (1/8)
Blessing (1/8)
JoyStone (1/8)
WindOrb (1/8)
FireOrb (1/8)
EarthOrb (1/8)
WaterOrb (1/8)
HolyOrb (1/8)
DarkOrb (1/8)
JoyStone (3/8)
Blessing (1/8)
HolyPlum (1/4)
MindKiwi (1/8)
Escape (1/8)

 
Hell Gate B65
 
Group LUK
0 - 42
LUK
43 - 56
LUK
57 - 100
A
Cure+ (1/8)
Magi+ (1/8)
LifeRock (1/8)
Antidote (1/8)
Ambrosia (1/8)
Arise (1/8)
Wind (1/8)
Fire (1/8)
Cure+++ (1/8)
Magi+++ (1/8)
VanCharm (1/8)
FolCharm (1/8)
SolCharm (1/8)
OhnCharm (1/8)
Jump (1/8)
Heal All (1/8)
Blessing (1/8)
JoyStone (1/8)
WindOrb (1/8)
FireOrb (1/8)
EarthOrb (1/8)
WaterOrb (1/8)
HolyOrb (1/8)
DarkOrb (1/8)

 
B
Cure+ (1/8)
Magi+ (1/8)
LifeRock (1/8)
Antidote (1/8)
Ambrosia (1/8)
Arise (1/8)
Wind (1/8)
Fire (1/8)
Cure+++ (1/8)
Magi+++ (1/8)
VanCharm (1/8)
FolCharm (1/8)
SolCharm (1/8)
OhnCharm (1/8)
Jump (1/8)
Heal All (1/8)
Blessing (1/8)
JoyStone (1/8)
WindOrb (1/8)
FireOrb (1/8)
EarthOrb (1/8)
WaterOrb (1/8)
HolyOrb (1/8)
DarkOrb (1/8)


Hell Gate B70
 
Group LUK
0 - 42
LUK
43 - 56
LUK
57 - 100
A
Cure+ (1/8)
Magi+ (1/8)
LifeRock (1/8)
Antidote (1/8)
Ambrosia (1/8)
Arise (1/8)
Wind (1/8)
Fire (1/8)
Cure+++ (1/8)
Magi+++ (1/8)
VanCharm (1/8)
FolCharm (1/8)
SolCharm (1/8)
OhnCharm (1/8)
Jump (1/8)
Heal All (1/8)
Blessing (1/8)
JoyStone (1/8)
WindOrb (1/8)
FireOrb (1/8)
EarthOrb (1/8)
WaterOrb (1/8)
HolyOrb (1/8)
DarkOrb (1/8)


Hell Gate B75
 
Group LUK
0 - 42
LUK
43 - 56
LUK
57 - 100
A
Cure+ (1/8)
Magi+ (1/8)
LifeRock (1/8)
Antidote (1/8)
Ambrosia (1/8)
Arise (1/8)
Wind (1/8)
Fire (1/8)
Cure+++ (1/8)
Magi+++ (1/8)
VanCharm (1/8)
FolCharm (1/8)
SolCharm (1/8)
OhnCharm (1/8)
Jump (1/8)
Heal All (1/8)
Blessing (1/8)
JoyStone (1/8)
WindOrb (1/8)
FireOrb (1/8)
EarthOrb (1/8)
WaterOrb (1/8)
HolyOrb (1/8)
DarkOrb (1/8)


Hell Gate B80
 
Group LUK
0 - 42
LUK
43 - 56
LUK
57 - 100
A
Cure+ (1/8)
Magi+ (1/8)
LifeRock (1/8)
Antidote (1/8)
Ambrosia (1/8)
Arise (1/8)
Wind (1/8)
Fire (1/8)
Cure+++ (1/8)
Magi+++ (1/8)
VanCharm (1/8)
FolCharm (1/8)
SolCharm (1/8)
OhnCharm (1/8)
Jump (1/8)
Heal All (1/8)
Blessing (1/8)
JoyStone (1/8)
WindOrb (1/8)
FireOrb (1/8)
EarthOrb (1/8)
WaterOrb (1/8)
HolyOrb (1/8)
DarkOrb (1/8)

 
B
Cure+ (1/8)
Magi+ (1/8)
LifeRock (1/8)
Antidote (1/8)
Ambrosia (1/8)
Arise (1/8)
Wind (1/8)
Fire (1/8)
Cure+++ (1/8)
Magi+++ (1/8)
VanCharm (1/8)
FolCharm (1/8)
SolCharm (1/8)
OhnCharm (1/8)
Jump (1/8)
Heal All (1/8)
Blessing (1/8)
JoyStone (1/8)
WindOrb (1/8)
FireOrb (1/8)
EarthOrb (1/8)
WaterOrb (1/8)
HolyOrb (1/8)
DarkOrb (1/8)


Hell Gate B85
 
Group LUK
0 - 42
LUK
43 - 56
LUK
57 - 100
A
Cure+ (1/8)
Magi+ (1/8)
LifeRock (1/8)
Antidote (1/8)
Ambrosia (1/8)
Arise (1/8)
Wind (1/8)
Fire (1/8)
Cure+++ (1/8)
Magi+++ (1/8)
VanCharm (1/8)
FolCharm (1/8)
SolCharm (1/8)
OhnCharm (1/8)
Jump (1/8)
Heal All (1/8)
Blessing (1/8)
JoyStone (1/8)
WindOrb (1/8)
FireOrb (1/8)
EarthOrb (1/8)
WaterOrb (1/8)
HolyOrb (1/8)
DarkOrb (1/8)

 
B
FoulPear (1/4)
Nest (1/8)
Obelon (1/8)
Steak (1/8)
Chicken (1/8)
Burger (1/8)
Octoball (1/8)
Blessing (1/8)
JoyStone (1/8)
WindOrb (1/8)
FireOrb (1/8)
EarthOrb (1/8)
WaterOrb (1/8)
HolyOrb (1/8)
DarkOrb (1/8)
JoyStone (3/8)
Blessing (1/8)
HolyPlum (1/4)
MindKiwi (1/8)
Escape (1/8)

 
Hell Gate B90
 
Group LUK
0 - 42
LUK
43 - 56
LUK
57 - 100
A
Cure+ (1/8)
Magi+ (1/8)
LifeRock (1/8)
Antidote (1/8)
Ambrosia (1/8)
Arise (1/8)
Wind (1/8)
Fire (1/8)
Cure+++ (1/8)
Magi+++ (1/8)
VanCharm (1/8)
FolCharm (1/8)
SolCharm (1/8)
OhnCharm (1/8)
Jump (1/8)
Heal All (1/8)
Blessing (1/8)
JoyStone (1/8)
WindOrb (1/8)
FireOrb (1/8)
EarthOrb (1/8)
WaterOrb (1/8)
HolyOrb (1/8)
DarkOrb (1/8)


Hell Gate B95
 
Group A Group B
LUK
0 - 42
LUK
43 - 56
LUK
57 - 100
LUK
0 - 42
LUK
43 - 56
LUK
57 - 100
FoulPear (1/4)
Nest (1/8)
Obelon (1/8)
Steak (1/8)
Chicken (1/8)
Burger (1/8)
Octoball (1/8)
Blessing (1/8)
JoyStone (1/8)
WindOrb (1/8)
FireOrb (1/8)
EarthOrb (1/8)
WaterOrb (1/8)
HolyOrb (1/8)
DarkOrb (1/8)
JoyStone (3/8)
Blessing (1/8)
HolyPlum (1/4)
MindKiwi (1/8)
Escape (1/8)

 
Cure+ (1/8)
Magi+ (1/8)
LifeRock (1/8)
Antidote (1/8)
Ambrosia (1/8)
Arise (1/8)
Wind (1/8)
Fire (1/8)
Cure+++ (1/8)
Magi+++ (1/8)
VanCharm (1/8)
FolCharm (1/8)
SolCharm (1/8)
OhnCharm (1/8)
Jump (1/8)
Heal All (1/8)
Blessing (1/8)
JoyStone (1/8)
WindOrb (1/8)
FireOrb (1/8)
EarthOrb (1/8)
WaterOrb (1/8)
HolyOrb (1/8)
DarkOrb (1/8)


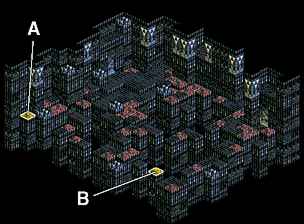
Last Level, First Visit

Nybbas: You finally made it to the bottom of the Hell Gate... You have made great progress. But can you kill me? I shall call demons from the eternal darkness. Come and destroy these meddling kids!! (summons undead) At least this will be the last time I have to see your ugly face!
 

Nybbas
Lich
Battle G: Last Level

Objective: Kill the leader!
Leader: Nybbas (drops Necro)
Enemies: 2 Skeletons, 2 Ghosts, 1 Knight Zombie, 1 Berzerker Zombie, 1 Wizard Zombie, 1 Amazon Zombie, 1 Archer Zombie
Union: Corpse
Notes:
  • None of the enemies have anything of interest, so just aim your attacks directly for Nybbas. If you have Presance or someone else with Starion it will make your life a whole lot easier, as you can use it to eliminate his entire team. Do keep in mind that he can summon more undead characters as you get rid of the ones he's got!


Nybbas: What? This body is supposed to be undead...? Why is it crumbling? Why? I, I have so many things that I must do...why...
 
Last Level, FireSeal Battle

Note: You will get this battle when you return to the Last Level of Hell Gate with the four Wind God Weapons. If you don't have all four of them (or if you've already got the FireSeal), you will have the next battle.
 

Blacmore
Lich
Battle H: Last Level

Objective: Kill the leader!
Leader: Blacmore (drops FireSeal)
Enemies: 3 Gremlins, 2 Goblins, 2 Gorgons, 2 Tiamats
Union: Unknown
Notes:
  • While Blacmore's allies are on the same level as your highest-leveled character, Blacmore himself is on Level 50 regardless of what level you're on. Therefore, it is quite possible that he'll be 10-20 levels higher than you! He is even more dangerous in this battle because he has a Magi+++ instead of an Undead Ring (which you would win from him if this weren't the battle for the FireSeal). His FireBurn spell will damage your characters for 100-200 points; if he gets to use Nova+, he'll virtually wipe out your entire party. No enemies here have anything overly important, so you're best off just focusing your most powerful attacks on Blacmore himself. If you have an Angel Knight, bring her--CalmSong can be priceless in this battle!


Last Level, Non-FireSeal Battle

Note: You will get this battle when you return to the Last Level of Hell Gate, provided that you either don't have all four Wind God Weapons or have already gotten the FireSeal.
 

Blacmore
Lich
Battle I: Last Level

Objective: Kill the leader!
Leader: Blacmore (drops Undead Ring )
Enemies: 2 Tiamats, Skeletons, Ghosts, Goblins, Gorgons, Gremlins
Union: Unknown
Notes:
  • The reason why the enemies are listed without number is because the actual battle you will get has a random assortment of them. Save the game in battle on floor B99, and if you don't like what you get, reload the data and try again!
     
  • While Blacmore's allies are on the same level as your highest-leveled character, Blacmore himself is on Level 50 regardless of what level you're on. Therefore, it is quite possible that he'll be 10-20 levels higher than you! His FireBurn spell will damage your characters for 100-200 points; if he gets to use Nova+, he'll virtually wipe out your entire party. If you have an Angel Knight, bring her--CalmSong can be priceless in this battle!
     
  • Some of the Ghosts that appear randomly in this battle will have Dark Law and, along with some of the Skeletons, will have the Stone of Dragos. You can also get WordRocks and Aileron from the enemies in this battle--be sure to check out their equipment!


Blacmore: And there you have it--that about covers what you'll see in Hell Gate. It may take a long time to get through it, but it offers you more of a challenge than the Roslolians! Also, you'll find a number of unique classes here, some of which you can recruit. Explore the Shrine of Asmodeus on your own!


Back to the Valeria Page
Back to the main page